Pages

Tuesday 24 July 2018

Skiing Finley

Hi Everyone

Today it is my turn to share some inspiration for Digi Doodle Studios 


I have used another of the cutest penguins.  This one is called Finley and I have coloured him with Copics and Diamond Sparkles Glitter.  (Colouring techniques learnt from Kit and Clowder) Isn't he cute on his Candy Cane Skis?

You can find all the gorgeous digis available from Digi Doodle Studios in the Store HERE 

Don't forget we have a couple of challenges running with time left to enter.  If you head over to the Facebook Group  there is an Anything Goes challenge.  All you need to do is upload your creation using a DDS Image for a chance to win.  There is also the Christmas in July challenge over on the Challenge Blog  You can use any image you like to enter over there but of course we would love it if you would use a DDS Image
 
My card is a 6" Square and the patterned papers are from Trimcraft.  The sentiment I hand stamped and is from Stampingallday.  To finish I added Red Pearl Gems


Thank you for taking the time to visit my blog today and share this card with me.  Please leave me a comment to let me know what you think.  Hope to see you again soon.


Saturday 21 July 2018

The Big 13!

Hi Everyone

Today is the start of the new challenge over at  A Gem of A Challenge


The theme for the next fortnight is Summertime/Holidays.  I hope that you can come on over and play along with us in this challenge and share your summery creations with us.

I used two digi images to create this card.  The first is Beach Hut which is precoloured and I merged one of my most favourite images Thoughtful Chloe (which I coloured with Copics) onto the steps.  

You can find all the gorgeous images here in the STORE

This card is for my friends Daughter who turns into a Teenager today.  The card is a 5 x 7 inch and I layered Blue and Mustard colours to keep with the colours of the beach hut.  The 13 Today I cut using a Robert Addams Die.


 Thank you for taking the time to visit my blog today and share this card with me.  Please leave me a comment to let me know what you think.  Hope to see you again soon


Friday 20 July 2018

Guest Designer at SheepSki Designs

Hi Everyone

I was so thrilled to be chosen to be a Guest Designer for the July/August Facebook Challenge in the SheepSki Designs Facebook Group


The theme is Fussy and Fancy or Clean and Simple.  As you know I struggle with the Fussy and Fancy style so I went for a CAS which I coloured in Black and White and just added a pop of Yellow.

All you need to do is enter using one of the Fabulous images available in the SheepSki Designs Store I hope to see you playing along this month!


The image is called Birthday Cocktail and I coloured with Copics and added Diamond Sparkles Glitter to give the Ice Cubes a little sparkle!  I edged it with a faux stitching border.


 Thank you for visiting my blog and sharing this card with me.  Please leave me a comment to let me know what you think.  Hope to see you again soon.

Sunday 15 July 2018

Monochrome Christmas Bears

Hi Everyone

It is the start of a new challenge today over at Monochrome Magic 


The theme for this month is Anything Goes Monochrome or Monochrome with a Twist of Christmas.  I do hope you can come on over and play along with me this month.

 Here is my DT inspiration card.  I adore this image called Igloo Bears from Pink Gem Designs and I coloured it up using Copics, Diamond Sparkles Glitter and a Clear Star Gelly Roll Pen.  The sentiment is hand stamped using a Memento Tuxedo Black Ink Pad and is from Stampingallday.  I went for CAS Style but this has so much sparkle I didn't need anything else!

 
 Thank you for taking the time to visit my blog today and share this card with me.  Please leave me a comment to let me know what you think.  Hope to see you again soon

Tuesday 10 July 2018

Cutest Christmas Penguin

Hi Everyone

I am here today to share with you one of the latest releases at Digi Doodle Studios 

I am not usually a fan of colouring penguins but I seem to have developed a fetish for colouring the DDS ones!

This cute digi is called Icey's Triple Dipper and I coloured him with Copics.  He was coloured using techniques from Kit and Clowder Online Colouring Classes 

You really need to visit the STORE and check out the new Christmas releases and all the other fabulously cute digis that are available.


I decided to print the image off quite large and make a CAS card.  I used Diamond Sparkles Glitter on the furry hat bits and also on the Ice Cream or Snow Cone as I think it might be called in winter!  The sentiment I hand stamped using a Memento Tuxedo Ink Pad and it is from Stampingallday.


There are more cute penguins available in the  STORE and in a couple of weeks you might just find another one appearing on my blog, so keep a look out for that lol.

Thank you for visiting my blog today and sharing this card with me.  Please leave me a comment to let me know what you think.  Hope to see you again soon 


Saturday 7 July 2018

Starry Ted

Hi Everyone

The new challenge starts today over at A Gem of A Challenge 


The theme for the next two weeks is Teddy Bears.

Here is my DT card using Football Teddy which I have coloured using ProMarkers.  I tend to go back to my ProMarkers when Bears are involved. It's like a comfort thing lol!

I made this card for my Son's friend who is 10 this month!

The Card blank is a 6" Square and the Footballl Background Card is from Buzzcraft.  I cut the stars using a nesting star die and added a football die cut too.


Thank you for visiting my blog today and sharing this card with me.  Please leave me a comment to let me know what you think.  Hope to see you again soon


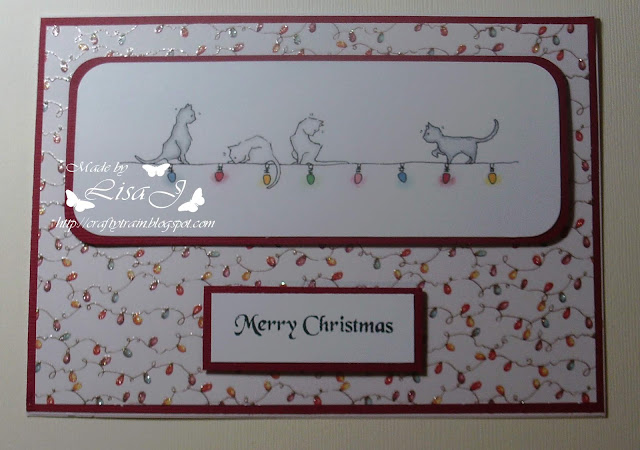
Christmas Cats

Hi Everyone

It is the start of this months challenge over at Creative Craft Cottage 


The theme for this month is The Most Wonderful Time of the Year.  We took a vote in the DT and decided that Christmas and Summer were the most popular but you may like Halloween or Spring.  I hope you can play along with us and share which is your favourite time of the year.

We have two sponsors for this challenge.  


and


I chose to work with an image from A Day For Daisies called  Little Cats Christmas
which I coloured with Copics and Chalks (for the light bulb glow) 

The Card is a 5" x 7" and the light bulb paper is from Helz Cuppleditch. Its glittery and textured too!  The sentiment I hand stamped and is from Stamping All Day.  I used a X-Cut Punch to round the corners of the image and the base layer.


Thank you for visiting my blog and sharing this card with me today.  Please leave me a comment to let me know what you think.  Hope to see you again soon

Friday 6 July 2018

Lovers Swing 40th Anniversary

Hi Everyone

I was asked by a friend to make a 40th Anniversary card for her parents.  She had a poem all picked out to go inside and chose this gorgeous image from Digi Doodle Studios called Lover's Swing for me to colour up which I did with Copics.  I then used a Go Kreate die to cut it out and layer it.

The Card is a 7" Square and the patterned paper is from WRS.  I typed the sentiment on the laptop before printing the image.  The heart die is an unnamed die and I finished with Clear Red Heart Gems.

I would like to enter this card into the following Challenges


 Thank you for taking the time to visit my blog and share this card with me.  Please leave me a comment to let me know what you think.  Hope to see you again soon.

Tuesday 3 July 2018

Green Hydrangea

Hi Everyone

Today is the start of the new challenge over at CCC Digi Creations 

The theme for this month is Monochrome and we are being sponsored by Delicious Doodles  I hope that you can come on over and play along with us

I chose to work with this image called Hydrangea Flower and I have coloured this with CopicsI used a very pale green to colour the flowers but it didn't show up very well in the photos.  

The Card blank is a 6" Square and the patterned papers are from a Wild Rose Studio Paper Pack.  Ihaven't used a doily for a while so thought would add one on this card.  The sentiment I typed on the laptop before printing the image.  I added some green pearl gems to finish off

I would like to enter this card into the following Challenges 
Crafty Catz - Anything Goes 
Incy Wincy Designs Challenge - Flowers 


 Thank you for taking the time to visit my blog and share this card with me.  Please leave me a comment to let me know what you think.  Hope to see you again soon

Lollipop with a Tutorial!

Hi Everyone

It is the start of the new challenge over at Unicorn Challenge 


 The theme for this month is Stitching Real OR Faux (Not one of my favourite themes but we have a Stitcher on the DT and she chose this one lol!) She does some fabulous X Stitch if you would like to visit her blog HERE and leave her some comments she would love it. 

The iamge I used for my project is called Baby Words from Paper Nest Dolls

I have made one of my favourite types of cards for my DT project this time which is a Lollipop Card.  I have been asked several times how I make these so I am going to attempt to do step by step instructions for this post.  If I have missed anything out or you need to know anything else about how I made this then please feel free to email me at ljanners@hotmail.com or leave me a question in the comments and I will get back to you. I have never done a tutorial before so bear with me lol!

Step 1. I Cut out the image out using a Go Kreate circle die and then two larger circles one for layering and one for the reverse


Step 2. I glued the frill onto both the front and back


 Step 3. I used red tape (double sided sticky tape) to attach the straw to one side.  I put some more on the top side ready to attach the back.  I also glued around the frill on both sides so that when they are sandwiched together they are secured with two layers of glue


Step 4. I pressed the back onto the front sandwiching the straw between both


Step 5.  I glued on the image.  If you have a message or info to go onto the back like baby's weight etc then print this info and cut out in a circle the same size as the image and glue on now


Step 6. I Added embellishments , bows, Roses etc


Step 7. My Lollipop is now finished!


I hope that you found this helpful in creating your own Lollipop Cards.  I love seeing the different ones around Blogland.

Thank you for visiting my blog today and sharing this with me.  Please leave me a comment to let me know what you think.  Hope to see you again soon.